Monday, June 13, 2011

Jazz dance - Dumb Love

Let's talk flexibility for a minute.  I think if I tried half the stuff she can do I'd break my sternum or a leg. Click on the images to see them larger.  

What makes these on stage, catch them while they are moving, photos really great?  
#1 depth of field.  #2 correct exposure #3 a very fast lens.  

One of the other dance moms asked me about my lens and I said she could get one for $2000 right now.  She about died.  But it's made me thousands more so I can't complain.  Really good lenses set you apart from the competition. That and knowing how to use them.  


That's the sternum shot.  Ouch.

 You can see the Swarovski crystals on her face here.  Super fun trick I learned from the ice dancers we photographed last year.
 She is already starting to stand up here so I didn't get the full effect and she was moving too fast or I would have flipped my camera horizontal.  When you are focusing on one person you typically want to hold your camera vertically.

Thursday, June 09, 2011

Dress Rehearsal

Sorry it's been a few days since I posted. I'm enjoying my class and the students are great.  More photos in the gallery than ever before. My daughter had her dress rehearsal today.  It's always a lot of fun but a little bit stressful. Daddy came along and helped video while I photographed.  This first photo is my favorite from today.  I will share ballet today, then jazz, and in a few days, tap and the finale.  

How do you get great dance photos? You need to set your camera on manual but keep your lens on auto focus.  f2.8, 1/160 second, ISO 1250. And just so you know I darkened this first photo in photoshop because I love the contrast on her face. I'm so glad they decorated the background. The stars are fun!


Friday, June 03, 2011

Photo First Aid - Week 1 - Spot Light Level Changes - Photoshop Elements 8.0


This is for those students taking my class right now that are using Photoshop Elements 8.0  If  you are not yet taking this class and like what you are learning in this video, please go here to register. You have a few days left to get signed up for Photo First Aid.

Photo First Aid Video- Week 1 -Tint, Tone, Vignette- Photoshop Elements 8.0 Version

This is for those students taking my class right now that are using Photoshop Elements 8.0  
If  you are not yet taking this class and like what you are learning in this video, please go here to register. You have a few days left to get signed up for Photo First Aid.

Spring or Cold Weather Vegetables

This is a fun photo of one of my Romaine Lettuce heads growing in my garden.  Can you see how catching the sunlight through the leaf adds so much texture and interest to the photo? Sorry it's not perfectly aligned.  I put the camera near the ground and clicked the shutter a few times.

A little camera tilt.  It can work to your good or bad so be careful.  Too much tilt is never a good thing. These are my peas a week ago.  They are looking good! I can hardly wait to eat me some Oregon Sugar Peas. If you are just starting to follow my blog, the trellis is cattle panel.

Thursday, June 02, 2011

Bright Day Light flower photos

As you can tell I am fascinated with my Nikon D7000 because it handles the highlights better than anything I've ever used.  Digital has been challenged by highlights.  So here it is in bright sun at 1pm.  Can you believe it?


Well and this thing is amazing.  My neighbor dug it out of her yard 2 springs ago and begged me to take it. Its very prolific. We got a few flowers last year.  But this is insane.  I can't wait to see them all in full bloom.  It's going to be spectacular.  Of course because they are so white, I will photograph them at dusk or on a cloudy day to capture more detail.

And here is a peek inside of some of my tulips out back.  Yes, it's June and I have tulips.  It snowed Monday.  What can I say? The thing that makes these tulips really look good is the f2.8.  It's fun to see them and see the background but be able to focus on the tulips.

And the alliums are starting to appear.  This is one from the small grouping.


And this is one of the larger alliums.  His Majesty is its name, I believe. I can't wait to see these in full bloom and I promise to share as long as the wind doesn't tear them off their stems tomorrow.

Again, straight out of the camera only because I forgot to pump up the vibrance with the jpeg raw slider. 

Wednesday, June 01, 2011

Photographing in the Garden - Horizontal and Vertical

I planted this peach tree last spring and pruned it up just like they told me in Andersons in the garden center.  Now I am going to have to find an expert to tell me what to do now.  I haven't a clue.  I solve this problem by asking questions. Here is one of the last blossoms.  The kids are so excited to grow their own peach I might just let it grow at least one or two this year.  

Nikon D7000, 50mm 1.8,  f1.8, 1/1250, ISO 200 and 6:57 p.m.
I was fighting with the sun on this one so it's not in a third but that's okay.  I like it. That's what matters. The leading lines help to compensate for that.  The branches lead you right to the blossom.

So here is another angle on photographing this blossom.  I love how the depth of field blurs the leaves closest to and furthest from the camera.  To me, depth of field used properly is a sign of a photographer who knows what they are doing or at least has an artistic eye. Depth of field helps you focus on the subject too.   
Nikon D7000, 50mm 1.8,  f1.8, 1/1000, ISO 200 and 6:57 p.m.


And here is the Dragon's Tongue Sedum.  I have two types.  One has red succulent leaves with red blossoms and this one is bright green with bright pink blossoms that remind me of The Dragon Who Liked to Spit Fire. It's extremely drought tolerant and transplants like you'd not believe.  I pulled a few pieces, stick them between some rocks in the backyard, watered them once and forgot about them.  Those 3 pieces are now 50 or more and snuggled right in between the rocks.

Nikon D7000, 50mm 1.8,  f2.8, 1/1250, ISO 200 and 6:54 p.m.

While the straight on shot is great its also nice to photograph from the side and also turn the camera orientation to horizontal. Click on this one to see it in more detail.


Tuesday, May 31, 2011

Preschool Graduation

My son graduated from preschool today.  All the 'big' kids came marching out of the preschool at the end of class with their cute graduation caps on.  Mrs. Rosemary made them.  I feel like I was just registering him for preschool.  Now we've registered him for Kindergarten.  And I can't believe this was the last day of preschool for us - ever.  I'm kinda happy to give up a little taxi-ing for a bit.

So now I would like to share a few tips on how to take these sweet little portraits that will make their grand appearance at his mission farewell and on his wedding day.  What we did was once we got home after a good celebration lunch and gift giving (I gave him one Cars 2 squinkie and ramp) and he was in a great mood we headed out to the north side of our house.  It was about 1pm here.  


Then I had him stand in the garden where the garage and office meet in a corner.  I set my camera at f2.8, and because he was about 10 feet away from the rock wall, it was nice and blurry, making him the focus.  Yep, aperture priority all the way! I had his back facing that corner and so the light fell across his face at a 45 degree angle.  Of course he is in the shade but just barely. If I stepped to the left a foot I would have been in the sun. This gave us some good bounce light and a little shade. 


Since you are in control of the camera you can do this quickly and take a few different angles and turn the camera which ever way your heart desires.  It's nice to be in charge of the portraits but make it quick. Happy kid, happy mom!

Again, these are straight out of the camera - no retouching.  Click on the images above to see them larger.

Monday, May 30, 2011

Carpet Phlox

All of these images are straight out of the camera - no retouching or manipulation of any kind.
I'll let you pick which images you like the best and I am just going to put the time.  Will you tell me which photos you like best - and why?

#1 - 7:02 p.m.

#2 - 7:10 p.m. (yes, these are the same purple flowers)

#3 - 7:03 p.m. 

#4 - 7:10 p.m.

As you can see on this last photo I added an element in the foreground.  Although it's out of focus having it there and something for the flowers to rest on gives the photo more dimension.  Oh and this is all carpet phlox.  It blooms only in the spring here.

Sunday, May 29, 2011

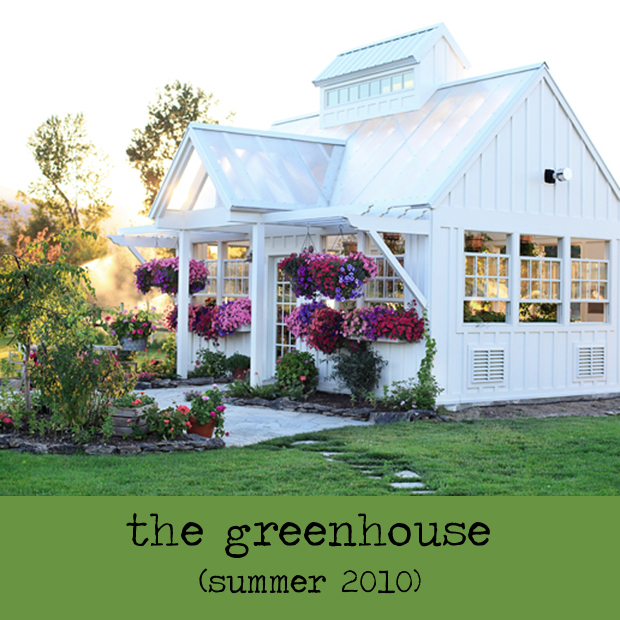
The ultimate greenhouse...

Now if I could just talk this couple into building something like this for me... he he he.
Check out The Meadow Brook Blog for more details or some of these photos below.  She has an amazing eye for photography and light.  So refreshing. I saw a link to this today and just had to share. I looked at every single post.  I can't believe what they've done to the Junk House too.  It's simply too sensational to describe.  What are you waiting for? Go check out her blog. 


I think my heart is about to leap out of my chest. Want to see another blog that I love with similar ideas? Go check out Sherelle's Blog too.  

Norway Maple - photograph

This is a Crimson King Norway Maple I purchased at Anderson Seed and Garden.  It has dark purple leaves all summer.  I love it and need to buy 3 more for the front yard.  It's doing much better than my fruit trees and doesn't drop all those blossoms and pollen like other maples around here do.  
 Have you ever photographed through leaves? You could probably do this any time of day as long as there is sun.  This was taken at 6:59 p.m. the same evening as the photos I've shown you the past few days. I love how seeing the veins adds interest and texture to the photo. And notice the composition.  The 'focal' leaf in this second photo is in the left third, not the center of the photo.

Gotta get a little lens flair.  I remember when this was taboo. Now it's trendy.  7:00 p.m. photo.  You can see how close the sun is to disappearing in the background.

And here it is at 7:15.  I love silhouettes. But as you can see the brilliant color is gone and that color is why I love this maple.  This time the leaves are in the upper third and the mountains in the lower third.

Every photo is straight out of the camera.  No photoshopping done at all. If I did anything at all I would have changed the intensity of the blue in the sky but that's about all. What is your favorite tree and have you taken any photos of it lately? 

Saturday, May 28, 2011

May 30th Giveaway Preview!

Want to end your Memorial Weekend with a little more fun?

Monday May 30th I am having another live chat to talk with you about my upcoming class, Photo First Aid.  I am so excited to announce that I will be giving away the following cool stuff.  Digital downloads are available world wide.  Anything that requires shipping, well, you need to live in the USA.  And of course, for Valhalla Salon and Spa you need to live in Cache Valley Utah.  
Creating Keepsakes Magazine - The Best of Digital Scrapbooking  
Cathy Zielske - 5 templates to 1 winner 
CottageArts.net –$10 gift certificate 
E-scapeAndScrap.net - $20 coupon  
The Ettes - The Photo Clusters Set 1 and discount
Valhalla Salon and Spa – Pedicure - you must be living in Cache Valley
 Jeanine DeOre –  5x7 Poppies Brag Book for everyone attending!
One Happy Momma - PreDesigned Blog - Blogger platform only

Expercom  - Coupon Code $20 discount and $20 Rebate on PS Elements 9.0 

Heritage Makers  - 12x12 post bound album

You must attend the chat to be eligible to win.

Friday, May 27, 2011

Tulips - yep, more tulips

But aren't these gorgeous?  I love the variety of colors.  That's what you get when you buy the bulk bag of red tulips from Lowes. There are even yellow tulips in the bunch.  And very few red actually.  But I love how it turned out.  And I love this photo.  The color and the texture of the flower.  Click on them to see them larger. 

Oh and remember yesterday's post? Those tulips looked better in the brighter side light.  These look better in the sweet light or the light left over after the sun went behind the mountain. These were taken at 7:12 p.m.  f2.8, 1/160, ISO 200 with my Nikon D7000- oh and I used aperture priority. Can I tell you how much I love this camera? It's seriously my favorite so far and I've owned $5,000 cameras. 

Thursday, May 26, 2011

Photographing Tulips - Light Matters

Light matters when photographing tulips.  These are my tulips.  And I always get asked what they are because they have several layers.  They are a type of parrot tulip.  I wish I could remember exactly but that'll give you a head start when you hit the garden center this fall. I started with 6.  Most other tulips get smaller with age but not these. Oh and Tulips need a lot of water in the fall or you'll get smaller blooms or just leaves.


My camera is a D7000 and I used my 50mm f1.8 lens.  My settings remained the same except that a few times I tried 1.8 but went back to 2.8.  These first few were taken at f 2.8, 1/200 second, ISO 200 in Fine Jpeg mode. In the photo above I darkened the blue saturation using the jpeg raw slider and that's it.  The rest I did nothing to.  Straight out of the camera.


These first few photos were taken at 6:55 p.m.  so the direction of light was from the side.  The mountains blocked the sun soon after this.  I thought I'd let you compare the photos. 

You can click on the photos to see them larger, just remember to come back and finish reading this quick lesson. As you can see the light shining through the petals and leaves is gorgeous. 

Now this photo was take at 7:11pm.  Can you see the difference? The sun just barely went behind the mountain. Still some direction of light.  Not the same contrast.  It's still pretty but it's lacking something.  Never assume that the sweet light that is great for some portraits is great for all types of photography.  Enjoy experimenting with light.  You'll be surprised what you find. 

Wednesday, May 25, 2011

Square Foot Garden - and other news

My dad came up with this concept and so I can't take credit for that.  He found this galvanized steel at Smith & Edwards in Ogden, Utah.  I hear they have other size panels too.  This is 6 inches deep and the box measures 10 feet by 3 feet.  The panels have been laying on the ground in his side yard for 4 years. As you can see, they don't rust. 


My Dad also recommended using clothes line cord to make the squares with.  So today I drilled 2 holes on this end that you can see here.  They are 1 foot apart.  On the far end I drilled 1.75 holes.  I would have finished but the fully charged battery gave its all.  So tomorrow if it's not raining I will drill a few more.  I have to drill 9 on each of the long panels too.

And as much as I love galvanized steel, I don't like the color.  So I got out the spray paint.  Let me just say right now that I WILL NEVER BUY SPRAY PAINT AGAIN THAT DOESN'T HAVE A TRIGGER. Trigger sprayers are the ONLY WAY TO GO.  Ouch! I sprayed the water buckets for grandma's train with a trigger sprayer I purchased at Lowes - much better!

For prep I got out my Black and Decker mouse sander and put the scrub pad on it.  Then I quickly buzzed all the way around the outside.  It cleaned it off wonderfully. Then I just sprayed the outside  of the box.  It looks 1000x's better and since my Dad gave me the supplies and I had the spray paint in the closet my bill is a whopping $1.50 for the bolts. 

You can see the weed mat in the bottom here.  I spent the better part of an afternoon digging the grass out of this flower bed.  I have so much more to dig out. Yes, it goes up that hill side.  you can see some of the daisies starting to grow for the season.  But instead of digging I decided to let every thing dry.  

I'll be filling it with the ready made Square Foot Garden mix from Millers.  

#1 reason- I don't want to try and mix it myself.  I have enough to do (like digging).
#2 they have tested everything from the pH to the nutrients to make sure it's complete.  
#3 they are located a few miles from here and a trailer full is less expensive than bags. 

Other news:
I thinned the Spinach today.  Why? Because I used more seeds than normal because they were a few years old and because my 5 year old helped me plant them. And because I hear that spinach needs to be 6" apart.  That means I'll be thinning more when it gets older.  You don't want to thin your vegetables too much the first go round because you don't want to end up losing some and not having enough plants.  

Digital Scrapbooking News: 
I've just started working on a new class for ReneePearson.com  It's going to be available in July hopefully.  I'm learning a new software to put this all together. But it's going to make it look better than ever.

Also, I have another giveaway on Monday MAY 30TH!!!  Oh yeah! And I will post everything in a day or two.  I know you can't wait to see all the prizes we'll be giving away. Can I just say Cathy Zielske is participating this time!