Showing posts with label Canning Green Beans. Show all posts

Monday, August 13, 2012

Catching up - Canning

I'm behind on posting but this is from the 8th of August. This is the second picking of the jade bush beans and the first pick of the wax beans. 

 I filled my entire deep stainless steel sink with jade bush green beans.  They weighed in at 14.8 lbs

And these yellow wax beans weighed in at 6 lbs. Honestly, I won't grow them again.  The jade bush gave me 3 pickings and these wax beans barely gave me a full picking before going dry. And they're tougher. 

I packed the jade bush in bags since I wasn't sure I was going to be able to can all 21 jars that day.  I DID get all 21 jars canned completely.  My pressure canner holds 7 quart jars.

Here the wax beans are getting blanched before adding them to the jars. 

Here are some of the jars sitting in the canner.  I wanted to see if I could get a pic of the rolling boil and yep, you can kind of see it.

14 jars cooling off with the last 7 in the canner.

Thursday, August 02, 2012

Canning Green Beans


 I canned green beans this week.  I showed a more step by step version last year - see HERE and HERE. It's finally starting to become second nature.

Boil the beans for 5 minutes and then place them in the colander. 


Added a tsp of canning salt per quart

Add boiling water and remove air bubbles with spatula.

Add the lids after simmering them.

Can you see the steam coming out.  Once it pops up the steam starts coming out of the right vent.  Then it's 10 minutes of venting before applying the weight to build pressure.


Kiwi hung out on my harvest basket while I canned.

Monday, August 15, 2011

Canning Green Beans - Tips

Okay, taking a break before I show you the finished product.  Here is the great illustrated guide in the Ball canning book.  It's like $5 and worth every penny.  Go get one. 

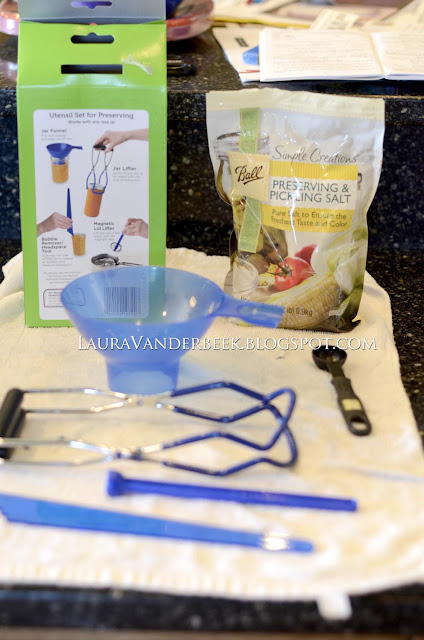
You can see the bag of preserving salt more clearly in this photo and the back of the Utensil set from Ball for canning. It's got everything except the teaspoon. 

And my Presto canner comes with instructions for Hot Pack and Raw Pack.  I prefer Hot Pack just to be sure.  When you decide to eat the green beans one thing I like to do it to bring them to a boil for 5 minutes just in case.

Sunday, August 14, 2011

canning Green Beans - part C

I love this little spatula for removing the air bubbles from the green beans.  Just run it around the sides and press inward.  

It also has these handy little notches on the other end so that you can measure the head room at the top of the jar.  Green beans need an inch.

Wipe the tops of the jars with a wet cloth to clean any residue off.  This helps get a secure fit. And this handy little lid lifter - because you don't want to try and chase these lids around in a pot of hot water.  This lid lifter helps keep things sanitary and it's a serious time saver.

Tighten the lids down but don't over do.  The air needs a little room to escape. Grab the finished 

Place the prepared jars in your pressure canner.

 Just like this.  My canner fits 7 quarts or 20 pints.  It's a Presto.  

 Close it up and bring it to a boil.  Let the steady stream of steam escape for 10 minutes. Then bring it up to pressure.  I live at 5,000 feet so the canner books says 13 lbs and the Ball canning book says 15 lbs.  It's better to be safe than sorry.  15 lbs it is.  When it reaches the right pressure then start your timer.  25 minutes for quarts.

More soon...

Saturday, August 13, 2011

Canning Green Beans - part B


After cleaning the jars and lids I like to place them in my water bath canner to keep them hot.  I place them in a couple inches of water - you don't want them to float.  After the water boils turn it down to a simmer.  

Also place the lids in simmering water - you don't want it to boil or it'll ruin them.

Strain the water out of the green beans.  I get a pyrex liquid measuring cup full of water and boil it in the microwave and have it ready to pour over the beans after they are in the jars.

Then I use this handy jar lifter to lift the hot jars out of the water bath.  

Place the jar on a dish cloth and I love this handy little funnel.  It keeps the tops of the jars clean. I prefer to fill my jars loosely with green beans.

Then I add 1 teaspoon of preserving and  pickling salt from ball.  If you use regular table salt it can turn the water cloudy.  This salt is more pure and helps keep the water cleaner looking.

More tomorrow...

Friday, August 12, 2011

Canning Green Beans - part A

This year I had the largest first picking of green beans ever! I picked 9 lbs and it covered 1/3 of my dining room table.  My children were anxious to help snap them - it only happens after the first pick.  And I was surprised they both stuck with me until it was done.  It actually went by really fast with their help.

Here is a close up of the green beans in my water bath canning pot.  

Yes, my little garden actually produced enough green beans to fill this pot.

The next step is to wash them in several changes of water.  I'm not sure how many several is so I say 3 or 4.  Sorry no photo.  Then cut them if you want.  My sister makes dill beans and doesn't cut them up.  

 Boil them for 5 minutes.  And I'll share some more tomorrow...


Saturday, September 11, 2010

Canning, Sewing, Gardening - Summertime fun for me!

So how do you photograph the details of your life? Like I've said before, I have a hard time photographing in public places when I'm not on a paid photo shoot.  I have yet to take my camera into the grocery store with me.  I have photographed my kids at the library but that's about it.  What to you enjoy photographing and what is a stretch for you?

So here is another first - bottling green beans for the first time.  I'll post the peaches soon. Last year I bottled peaches for the first time - 23 quarts.  This year we have 45 so far.  We need more to get us through an entire year.  My husband is really the only one who eats the peaches. I just noticed how frayed my kitchen towel is.  Time to update - these can go to the garage.

This is the first casual dress that I've sewn for my daughter from a pattern.  The pattern is from Simplicity. If you watch the JoAnn or Hobby Lobby ads, they often have $1 pattern sales. We stock up then. I put one sleeve on 3 times trying to get it right and it wasn't the first sleeve.  Rule of Sewing - don't sew when you're exhausted.  Oh wait, then I'd never get anything done!

We've also started picking these pumpkins.  Be sure to leave them on until their color is nice.  Then pick them and stick them in a window.  The plants will continue to produce more and more.  I seem to have good luck with this brand and the Spirit Bush pumpkins.  We might even get a few jack-be-littles if we are lucky.  I've really got to amend my soil.
Now I better get the invites ready for the Primary Pizza Party. See you in a day or two again.